SpringBoot集成MySQL - MyBatis-Plus代码自动生成
SpringBoot集成MySQL - MyBatis-Plus代码自动生成
本文主要介绍 MyBatis-Plus代码自动生成,以及产生此类代码生成工具的背景和此类工具的基本实现原理。@pdai
知识准备
需要了解MyBatis和MyBatis-Plus基础,并了解产生此类代码生成工具的背景和基本原理。
MyBatis-Plus相关
SpringBoot集成MySQL - MyBatis-Plus方式
为什么会产生此类代码生成工具?
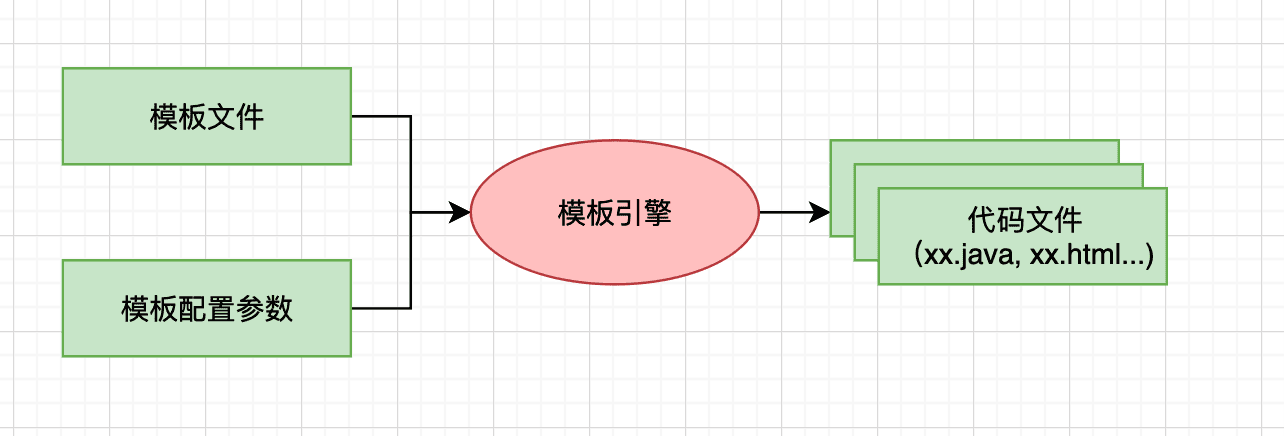
由于CRUD的工作占了普通开发很多工作,而这些工作是重复的,所以出现了此类的代码生成工具。这些工具通过模板引擎来生成代码,常见于三方集成工具,IDE插件等等。
什么是模板引擎?
模板引擎可以在代码生成过程中减少大量机械重复工作,大大提高开发效率,良好的设计使得代码重用,后期维护都降低成本。一个好的模板引擎的使用要考虑的方面无外乎:功能是否强大,使用是否简单,整合性、扩展性与灵活性,性能。 比如:
- Velocity
- FreeMarker
- Thymeleaf
- ...

简单示例
这里展示通过MyBatis-Plus生成代码实现的
准备DB
创建MySQL的schema test_db, 导入SQL 文件如下
    -- MySQL dump 10.13 Distrib 5.7.12, for Win64 (x86_64)
    --
    -- Host: localhost Database: test_db
    -- ------------------------------------------------------
    -- Server version 5.7.17-log

    /*!40101 SET @OLD_CHARACTER_SET_CLIENT=@@CHARACTER_SET_CLIENT */;
    /*!40101 SET @OLD_CHARACTER_SET_RESULTS=@@CHARACTER_SET_RESULTS */;
    /*!40101 SET @OLD_COLLATION_CONNECTION=@@COLLATION_CONNECTION */;
    /*!40101 SET NAMES utf8 */;
    /*!40103 SET @OLD_TIME_ZONE=@@TIME_ZONE */;
    /*!40103 SET TIME_ZONE='+00:00' */;
    /*!40014 SET @OLD_UNIQUE_CHECKS=@@UNIQUE_CHECKS, UNIQUE_CHECKS=0 */;
    /*!40014 SET @OLD_FOREIGN_KEY_CHECKS=@@FOREIGN_KEY_CHECKS, FOREIGN_KEY_CHECKS=0 */;
    /*!40101 SET @OLD_SQL_MODE=@@SQL_MODE, SQL_MODE='NO_AUTO_VALUE_ON_ZERO' */;
    /*!40111 SET @OLD_SQL_NOTES=@@SQL_NOTES, SQL_NOTES=0 */;

    --
    -- Table structure for table `tb_role`
    --

    DROP TABLE IF EXISTS `tb_role`;
    /*!40101 SET @saved_cs_client = @@character_set_client */;
    /*!40101 SET character_set_client = utf8 */;
    CREATE TABLE `tb_role` (
      `id` int(11) NOT NULL AUTO_INCREMENT,
      `name` varchar(255) NOT NULL,
      `role_key` varchar(255) NOT NULL,
      `description` varchar(255) DEFAULT NULL,
      `create_time` datetime DEFAULT NULL,
      `update_time` datetime DEFAULT NULL,
      PRIMARY KEY (`id`)
    ) ENGINE=InnoDB AUTO_INCREMENT=2 DEFAULT CHARSET=utf8;
    /*!40101 SET character_set_client = @saved_cs_client */;

    --
    -- Dumping data for table `tb_role`
    --

    LOCK TABLES `tb_role` WRITE;
    /*!40000 ALTER TABLE `tb_role` DISABLE KEYS */;
    INSERT INTO `tb_role` VALUES (1,'admin','admin','admin','2021-09-08 17:09:15','2021-09-08 17:09:15');
    /*!40000 ALTER TABLE `tb_role` ENABLE KEYS */;
    UNLOCK TABLES;

    --
    -- Table structure for table `tb_user`
    --

    DROP TABLE IF EXISTS `tb_user`;
    /*!40101 SET @saved_cs_client = @@character_set_client */;
    /*!40101 SET character_set_client = utf8 */;
    CREATE TABLE `tb_user` (
      `id` int(11) NOT NULL AUTO_INCREMENT,
      `user_name` varchar(45) NOT NULL,
      `password` varchar(45) NOT NULL,
      `email` varchar(45) DEFAULT NULL,
      `phone_number` int(11) DEFAULT NULL,
      `description` varchar(255) DEFAULT NULL,
      `create_time` datetime DEFAULT NULL,
      `update_time` datetime DEFAULT NULL,
      PRIMARY KEY (`id`)
    ) ENGINE=InnoDB AUTO_INCREMENT=2 DEFAULT CHARSET=utf8;
    /*!40101 SET character_set_client = @saved_cs_client */;

    --
    -- Dumping data for table `tb_user`
    --

    LOCK TABLES `tb_user` WRITE;
    /*!40000 ALTER TABLE `tb_user` DISABLE KEYS */;
    INSERT INTO `tb_user` VALUES (1,'pdai','dfasdf','suzhou.daipeng@gmail.com',1212121213,'afsdfsaf','2021-09-08 17:09:15','2021-09-08 17:09:15');
    /*!40000 ALTER TABLE `tb_user` ENABLE KEYS */;
    UNLOCK TABLES;

    --
    -- Table structure for table `tb_user_role`
    --

    DROP TABLE IF EXISTS `tb_user_role`;
    /*!40101 SET @saved_cs_client = @@character_set_client */;
    /*!40101 SET character_set_client = utf8 */;
    CREATE TABLE `tb_user_role` (
      `user_id` int(11) NOT NULL,
      `role_id` int(11) NOT NULL
    ) ENGINE=InnoDB DEFAULT CHARSET=utf8;
    /*!40101 SET character_set_client = @saved_cs_client */;

    --
    -- Dumping data for table `tb_user_role`
    --

    LOCK TABLES `tb_user_role` WRITE;
    /*!40000 ALTER TABLE `tb_user_role` DISABLE KEYS */;
    INSERT INTO `tb_user_role` VALUES (1,1);
    /*!40000 ALTER TABLE `tb_user_role` ENABLE KEYS */;
    UNLOCK TABLES;
    /*!40103 SET TIME_ZONE=@OLD_TIME_ZONE */;

    /*!40101 SET SQL_MODE=@OLD_SQL_MODE */;
    /*!40014 SET FOREIGN_KEY_CHECKS=@OLD_FOREIGN_KEY_CHECKS */;
    /*!40014 SET UNIQUE_CHECKS=@OLD_UNIQUE_CHECKS */;
    /*!40101 SET CHARACTER_SET_CLIENT=@OLD_CHARACTER_SET_CLIENT */;
    /*!40101 SET CHARACTER_SET_RESULTS=@OLD_CHARACTER_SET_RESULTS */;
    /*!40101 SET COLLATION_CONNECTION=@OLD_COLLATION_CONNECTION */;
    /*!40111 SET SQL_NOTES=@OLD_SQL_NOTES */;

    -- Dump completed on 2021-09-08 17:12:11
添加POM依赖
包括mybatis-plus-generator和默认的模板引擎velocity依赖的velocity-engine-core。
    <dependency>
        <groupId>com.baomidou</groupId>
        <artifactId>mybatis-plus-boot-starter</artifactId>
        <version>3.5.1</version>
    </dependency>
    <dependency>
        <groupId>com.baomidou</groupId>
        <artifactId>mybatis-plus-generator</artifactId>
        <version>3.5.2</version>
    </dependency>
    <dependency>
        <groupId>org.apache.velocity</groupId>
        <artifactId>velocity-engine-core</artifactId>
        <version>2.0</version>
    </dependency>
代码生成配置
mybatis-plus-generator 3.5.1 及其以上版本,对历史版本不兼容!3.5.1 以下的请参考这里 在新窗口打开
    import com.baomidou.mybatisplus.generator.FastAutoGenerator;

    /** * This class is for xxxx. * * @author pdai */
    public class TestGenCode {

        public static void main(String[] args) {
            FastAutoGenerator.create("jdbc:mysql://localhost:3306/test_db?useSSL=false&autoReconnect=true&characterEncoding=utf8", "test", "bfXa4Pt2lUUScy8jakXf")
                    .globalConfig(builder ->
                            builder.author("pdai") // 设置作者
                                    .enableSwagger() // 开启 swagger 模式
                    )
                    .packageConfig(builder ->
                            builder.parent("tech.pdai.springboot.mysql8.mybatisplus.anno") // 设置父包名
                                    .moduleName("gencode") // 设置父包模块名
                    )
                    .strategyConfig(builder ->
                            builder.addInclude("tb_user", "tb_role", "tb_user_role")
                    )
                    .execute();
        }
    }
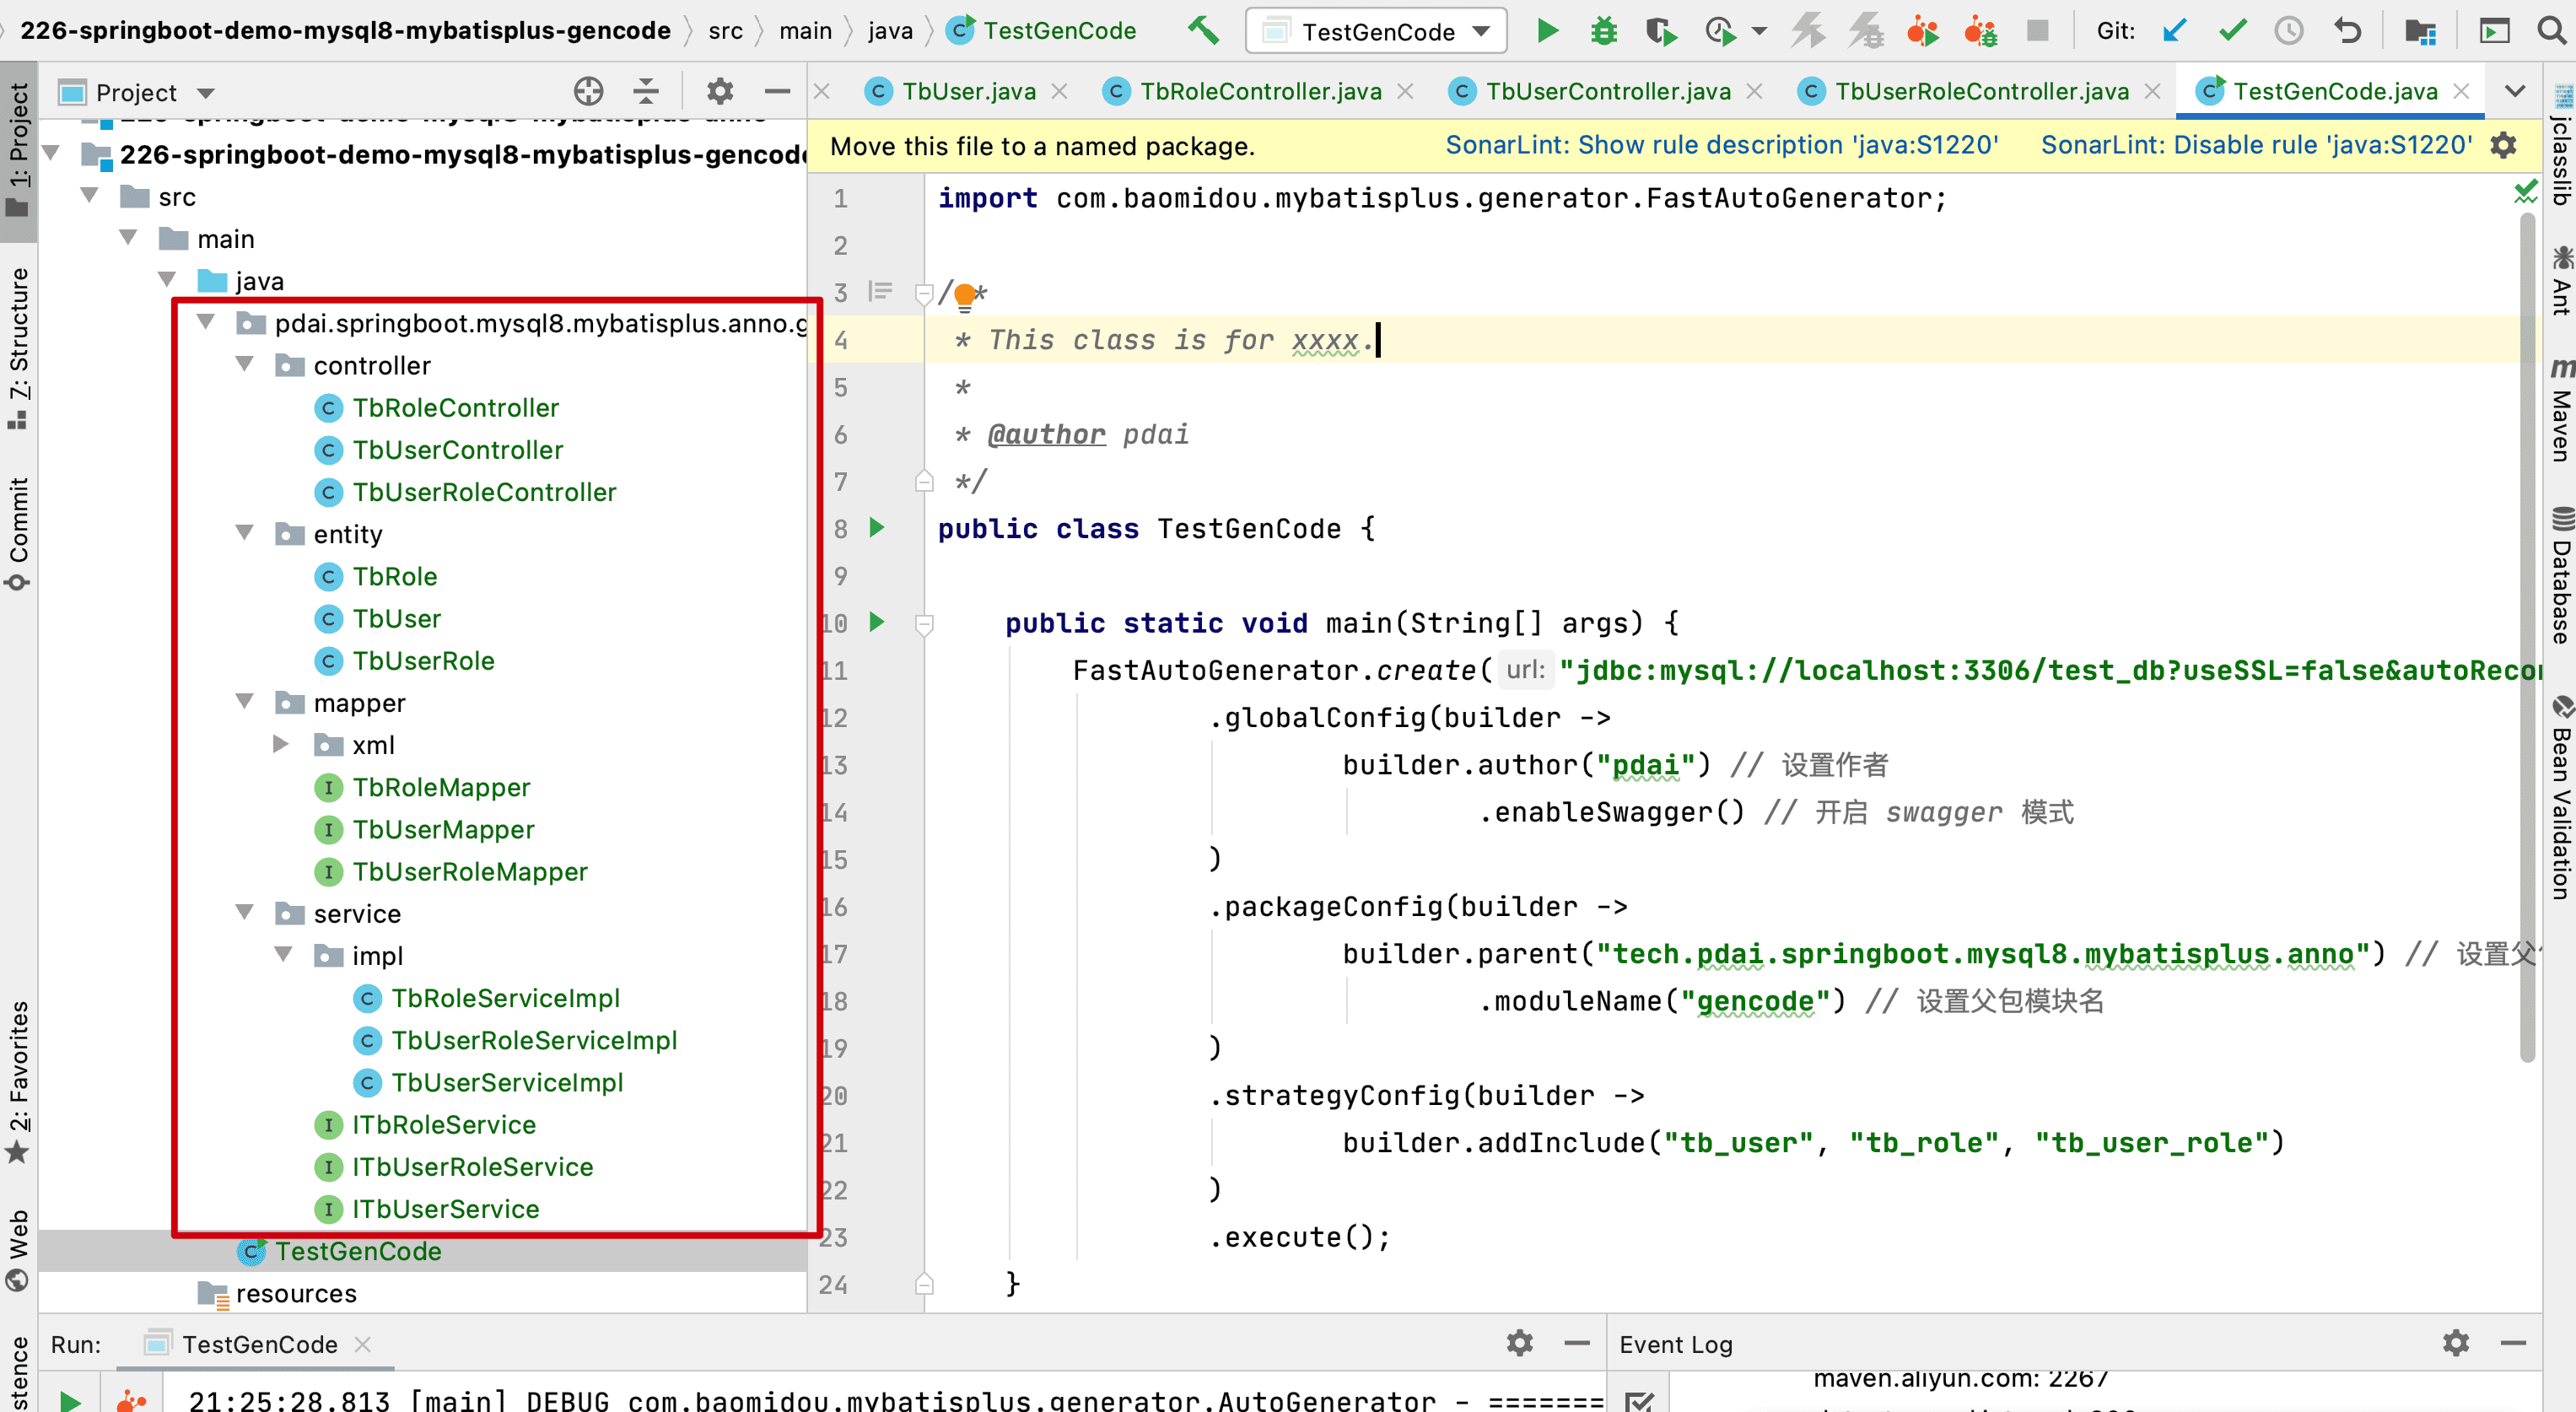
生成代码

进一步理解
主要了解MyBatis-Plus生成代码的原理。
代码生成的基本原理
其实代码生成是非常简单的,有了模板引擎的介绍,我们再看下MyBatis-Plus的代码生成工具是如何生成代码的。
配置的装载, FastAutoGenerator本质上就是通过builder注入各种配置,并将它交给代码生成主类:AutoGenerator
    public void execute() {
        new AutoGenerator(this.dataSourceConfigBuilder.build())
            // 全局配置
            .global(this.globalConfigBuilder.build())
            // 包配置
            .packageInfo(this.packageConfigBuilder.build())
            // 策略配置
            .strategy(this.strategyConfigBuilder.build())
            // 注入配置
            .injection(this.injectionConfigBuilder.build())
            // 模板配置
            .template(this.templateConfigBuilder.build())
            // 执行
            .execute(this.templateEngine);
    }
AutoGenerator中execute方法,包括初始化配置和模板引擎(默认是Velocity),然后将配置交给模板引擎初始化执行文件输出
    /** * 生成代码 * * @param templateEngine 模板引擎 */
    public void execute(AbstractTemplateEngine templateEngine) {
        logger.debug("==========================准备生成文件...==========================");
        // 初始化配置
        if (null == config) {
            config = new ConfigBuilder(packageInfo, dataSource, strategy, template, globalConfig, injection);
        }
        if (null == templateEngine) {
            // 为了兼容之前逻辑,采用 Velocity 引擎 【 默认 】
            templateEngine = new VelocityTemplateEngine();
        }
        templateEngine.setConfigBuilder(config);
        // 模板引擎初始化执行文件输出
        templateEngine.init(config).batchOutput().open();
        logger.debug("==========================文件生成完成!!!==========================");
    }
模板引擎中batchOuput方法中,包含获取表的信息并根据模板来生成类文件。
    /** * 批量输出 java xml 文件 */
    @NotNull
    public AbstractTemplateEngine batchOutput() {
        try {
            ConfigBuilder config = this.getConfigBuilder();
            List<TableInfo> tableInfoList = config.getTableInfoList();
            tableInfoList.forEach(tableInfo -> {
                Map<String, Object> objectMap = this.getObjectMap(config, tableInfo);
                Optional.ofNullable(config.getInjectionConfig()).ifPresent(t -> {
                    t.beforeOutputFile(tableInfo, objectMap);
                    // 输出自定义文件
                    outputCustomFile(t.getCustomFile(), tableInfo, objectMap);
                });
                // entity
                outputEntity(tableInfo, objectMap);
                // mapper and xml
                outputMapper(tableInfo, objectMap);
                // service
                outputService(tableInfo, objectMap);
                // controller
                outputController(tableInfo, objectMap);
            });
        } catch (Exception e) {
            throw new RuntimeException("无法创建文件,请检查配置信息!", e);
        }
        return this;
    }
获取表的列表,由ConfigBuilder完成
    public List<TableInfo> getTableInfoList() {
        if (tableInfoList.isEmpty()) {
            // TODO 暂时不开放自定义
            List<TableInfo> tableInfos = new IDatabaseQuery.DefaultDatabaseQuery(this).queryTables();
            if (!tableInfos.isEmpty()) {
                this.tableInfoList.addAll(tableInfos);
            }
        }
        return tableInfoList;
    }
然后获取上述单个表(tableInfo)的具体信息(objectMap)
    /** * 渲染对象 MAP 信息 * * @param config 配置信息 * @param tableInfo 表信息对象 * @return ignore */
    @NotNull
    public Map<String, Object> getObjectMap(@NotNull ConfigBuilder config, @NotNull TableInfo tableInfo) {
        StrategyConfig strategyConfig = config.getStrategyConfig();
        Map<String, Object> controllerData = strategyConfig.controller().renderData(tableInfo);
        Map<String, Object> objectMap = new HashMap<>(controllerData);
        Map<String, Object> mapperData = strategyConfig.mapper().renderData(tableInfo);
        objectMap.putAll(mapperData);
        Map<String, Object> serviceData = strategyConfig.service().renderData(tableInfo);
        objectMap.putAll(serviceData);
        Map<String, Object> entityData = strategyConfig.entity().renderData(tableInfo);
        objectMap.putAll(entityData);
        objectMap.put("config", config);
        objectMap.put("package", config.getPackageConfig().getPackageInfo());
        GlobalConfig globalConfig = config.getGlobalConfig();
        objectMap.put("author", globalConfig.getAuthor());
        objectMap.put("kotlin", globalConfig.isKotlin());
        objectMap.put("swagger", globalConfig.isSwagger());
        objectMap.put("date", globalConfig.getCommentDate());
        // 启用 schema 处理逻辑
        String schemaName = "";
        if (strategyConfig.isEnableSchema()) {
            // 存在 schemaName 设置拼接 . 组合表名
            schemaName = config.getDataSourceConfig().getSchemaName();
            if (StringUtils.isNotBlank(schemaName)) {
                schemaName += ".";
                tableInfo.setConvert(true);
            }
        }
        objectMap.put("schemaName", schemaName);
        objectMap.put("table", tableInfo);
        objectMap.put("entity", tableInfo.getEntityName());
        return objectMap;
    }
根据TableInfo和objectMap输出类文件,以输出Entity实体类为例
    /** * 输出实体文件 * * @param tableInfo 表信息 * @param objectMap 渲染数据 * @since 3.5.0 */
    protected void outputEntity(@NotNull TableInfo tableInfo, @NotNull Map<String, Object> objectMap) {
        String entityName = tableInfo.getEntityName();
        String entityPath = getPathInfo(OutputFile.entity);
        if (StringUtils.isNotBlank(entityName) && StringUtils.isNotBlank(entityPath)) {
            getTemplateFilePath(template -> template.getEntity(getConfigBuilder().getGlobalConfig().isKotlin())).ifPresent((entity) -> {
                String entityFile = String.format((entityPath + File.separator + "%s" + suffixJavaOrKt()), entityName);
                outputFile(new File(entityFile), objectMap, entity, getConfigBuilder().getStrategyConfig().entity().isFileOverride());
            });
        }
    }
在outputFile中来确定生成文件的名字和路径
    /** * 输出文件 * * @param file 文件 * @param objectMap 渲染信息 * @param templatePath 模板路径 * @param fileOverride 是否覆盖已有文件 * @since 3.5.2 */
    protected void outputFile(@NotNull File file, @NotNull Map<String, Object> objectMap, @NotNull String templatePath, boolean fileOverride) {
        if (isCreate(file, fileOverride)) {
            try {
                // 全局判断【默认】
                boolean exist = file.exists();
                if (!exist) {
                    File parentFile = file.getParentFile();
                    FileUtils.forceMkdir(parentFile);
                }
                writer(objectMap, templatePath, file);
            } catch (Exception exception) {
                throw new RuntimeException(exception);
            }
        }
    }
最后通过writer方法生成文件
    /** * 将模板转化成为文件 * * @param objectMap 渲染对象 MAP 信息 * @param templatePath 模板文件 * @param outputFile 文件生成的目录 * @throws Exception 异常 * @since 3.5.0 */
    public void writer(@NotNull Map<String, Object> objectMap, @NotNull String templatePath, @NotNull File outputFile) throws Exception {
        this.writer(objectMap, templatePath, outputFile.getPath());
        logger.debug("模板:" + templatePath + "; 文件:" + outputFile);
    }
本质上就是调用模板引擎来生成
        @Override
        public void writer(@NotNull Map<String, Object> objectMap, @NotNull String templatePath, @NotNull File outputFile) throws Exception {
            Template template = velocityEngine.getTemplate(templatePath, ConstVal.UTF8);
            try (FileOutputStream fos = new FileOutputStream(outputFile);
                 OutputStreamWriter ow = new OutputStreamWriter(fos, ConstVal.UTF8);
                 BufferedWriter writer = new BufferedWriter(ow)) {
                template.merge(new VelocityContext(objectMap), writer);
            }
        }
比如Entity,velocityEngine.getTemplate会获取如下entity.vm模板生成Entity的类文件。
    package ${package.Entity};

    #foreach($pkg in ${table.importPackages})
    import ${pkg};
    #end
    #if(${swagger})
    import io.swagger.annotations.ApiModel;
    import io.swagger.annotations.ApiModelProperty;
    #end

    /** * <p> * $!{table.comment} * </p> * * @author ${author} * @since ${date} */
    #if(${table.convert})
    @TableName("${schemaName}${table.name}")
    #end
    #if(${swagger})
    @ApiModel(value = "${entity}对象", description = "$!{table.comment}")
    #end
    #if(${superEntityClass})
    class ${entity} : ${superEntityClass}#if(${activeRecord})<${entity}>#end() {
    #elseif(${activeRecord})
    class ${entity} : Model<${entity}>() {
    #elseif(${entitySerialVersionUID})
    class ${entity} : Serializable {
    #else
    class ${entity} {
    #end

    ## ----------  BEGIN 字段循环遍历  ----------
    #foreach($field in ${table.fields})
    #if(${field.keyFlag})
    #set($keyPropertyName=${field.propertyName})
    #end
    #if("$!field.comment" != "")
        #if(${swagger})
        @ApiModelProperty(value = "${field.comment}")
        #else
        /** * ${field.comment} */
        #end
    #end
    #if(${field.keyFlag})
    ## 主键
    #if(${field.keyIdentityFlag})
        @TableId(value = "${field.annotationColumnName}", type = IdType.AUTO)
    #elseif(!$null.isNull(${idType}) && "$!idType" != "")
        @TableId(value = "${field.annotationColumnName}", type = IdType.${idType})
    #elseif(${field.convert})
        @TableId("${field.annotationColumnName}")
    #end
    ## 普通字段
    #elseif(${field.fill})
    ## -----   存在字段填充设置   -----
    #if(${field.convert})
        @TableField(value = "${field.annotationColumnName}", fill = FieldFill.${field.fill})
    #else
        @TableField(fill = FieldFill.${field.fill})
    #end
    #elseif(${field.convert})
        @TableField("${field.annotationColumnName}")
    #end
    ## 乐观锁注解
    #if(${field.versionField})
        @Version
    #end
    ## 逻辑删除注解
    #if(${field.logicDeleteField})
        @TableLogic
    #end
        #if(${field.propertyType} == "Integer")
        var ${field.propertyName}: Int? = null
        #else
        var ${field.propertyName}: ${field.propertyType}? = null
        #end

    #end
    ## ----------  END 字段循环遍历  ----------
    #if(${entityColumnConstant})
        companion object {
    #foreach($field in ${table.fields})

            const val ${field.name.toUpperCase()} : String = "${field.name}"

    #end
        }

    #end
    #if(${activeRecord})
        override fun pkVal(): Serializable? {
    #if(${keyPropertyName})
            return ${keyPropertyName}
    #else
            return null
    #end
        }

    #end
        override fun toString(): String {
            return "${entity}{" +
    #foreach($field in ${table.fields})
    #if($!{foreach.index}==0)
            "${field.propertyName}=" + ${field.propertyName} +
    #else
            ", ${field.propertyName}=" + ${field.propertyName} +
    #end
    #end
            "}"
        }
    }
同理生成mapper, service, controller等文件。是不是很简单?
如何看MyBatis-Plus生成代码的功能?
简单而言,对于初学者好像能生成代码作用很大,实际情况是很鸡肋!
- 从上面的源码我们可以看出,生成类只适合单表结构,表的关联无法处理;
- 对于单表的CRUD类,如果可以自动化生成,必然是可以很好的抽象的,而BaseMapper, BaseServiceImpl的封装已经足够了;
- 通常真正可以通过一体化集成前端代码的生成,才有一定的意义;
- 当然少部分情况快速提供接口的可以考虑,不过其实也省不了什么时间。
示例源码
https://github.com/realpdai/tech-pdai-spring-demos